I’ve written on and on about the .2 seconds it took me to walk in the house and fall in love. And how a big part of that was the original stairs, banister, woodwork and fireplace that it took just one glance to see. But another big part of it was the original window pane doors that hung on either side of the fireplace, leading from the living room into the office.


Sadly, we took the doors down when refinishing the wood work in the house, and they’ve been anxiously awaiting a facelift ever since. The poor things have been sitting in the basement unattended for over a year. Number 1, I can’t believe it’s been that long. Number 2, I’m thankful it’s finally time to get started on bringing these doors back to life, giving the entryways a much more finished look.
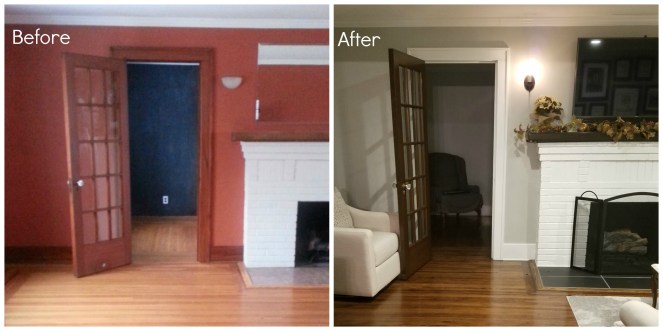
Just like the other doors we recently refinished, and similar to the banister, floors, mantel and just about every other woodworking project we’ve tackled, our goal was to take what Dan calls “orange-tinted” wood and stain it darker.
The first thing to do was a process Dan was all too familiar with – using chemical stripper to remove the poly and stain, followed by a good sanding with multiple grits. Given the grooves in each of the 15 windows, and the fact that there were two sides to two doors that needed addressing, this was a tedious task to say the least. Luckily, Dan has the patience of a saint (he puts up with me, doesn’t he?). By working on one side of a door a day, he was able to break up the work and not drive himself too crazy.

Dan then hung the doors in place, as he’s found it easier to put the finishing coats on doors when they’re already up, plus he can get both sides at once. After thoroughly cleaning the doors to get rid of every spec of dust from sanding, and taping every window to avoid a mess on the glass (guess who got to do that?), it was time for stain.

Again, we’re going with General Finish’s Spiced Walnut, as it gives us that dark walnut look with just a hint of red. We ended up with two layers of stain, followed by three layers of poly, to ensure the doors would be protected from the chaos that our house is likely to be in the future. With a layer a day, we were careful to ensure that no dust dried into the doors in between coats. In fact, as the weather turned cold for a few days, we refrained from turning our heat on for the sole purpose of avoiding any dust floating around the air that otherwise wouldn’t be there.


And now the long wait was finally over.
The doors were back in place and back to beautiful.


It’s just beautiful! You turned the entire wall into a piece of art!! ❤ I continue to be amazed!
LikeLike
Great job; it looks ready for Thanksgiving.
LikeLike