The room with the exposed brick fireplace that was the first project started and last one finished is now truly a blank canvas for us to make our own. We’ve decided that the bonus room on the left side of the house will be used as office space. In a previous post, I wrote about the main entrance and foyer closet door being refinished. A project that has been long anticipated is the refinishing of the office doors, as they were one of the first things I noticed in the .2 seconds it took me to walk in the house and fall in love. We took the doors down when refinishing the wood work in the house, and they’ve been anxiously awaiting a facelift ever since. This project is next in the line up, and I can’t wait for us to get started, as its going to complete the look of not only the office but the living room that leads into it.


But in the mean time, we’ve been working on a few other projects to complete the inside of the office itself. With an entrance on either side, we envisioned two reading chairs in opposite corners, with desk and chair in the middle. And as all our projects go, we decided to refinish some old pieces to help complete the room.
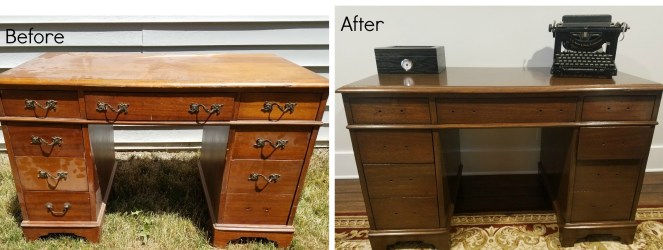
Desk
The first was a solid wood desk that we found for $40 on Craigslist. A few scratches here and there, and a few imperfections in the stain/finish, but other than that, it was in great shape and ready for us to bring it back to life.


Dan used stripper to remove the old poly and stain, and then followed up with a sander to smooth out any of the nicks and imperfections that were left behind.


There were a few spots on the bottom of the front legs where the veneer had peeled off. Dan performed a bit of doctoring to use some veneer from the back of the desk to fill in the front legs. This patchwork now goes almost unnoticed.
The desk was now ready to be brought back to life with a fresh coat of new stain, dark walnut of course.
With all our wood projects, there’s always much anticipation on how a particular wood is going to stain. The desk itself turned out beautiful, and the poly that we added really made it shine.
And while this desk is now finished and in our office, you’ll likely notice that it’s still missing drawer pulls. We removed the hardware that came with the desk, as it wasn’t original and some of them were missing. We’re hoping to replace those with drawer pulls that we find at an old salvage shop… one day.

Chair
Now that we had the desk finished, you need something to sit in, right? Well this chair is something that I’ll call a “freebie find,” and while it looked to be in rough shape, there was so much potential.

The idea for this was to paint the frame black, and reupholster the cushion. Not too much of a lift. The wicker weave was a bit too far gone, so the first thing Dan did was remove that, as the frame of the chair still provides enough support by itself.
Dan was excited because he recently purchased a small paint sprayer that’s designed to be used for small furniture projects, just like this one. So he finally had the opportunity to test it out. I’ll have to say, the paint sprayer worked like a charm, evenly coating the chair in 1/10 of the time it would take to use a brush, and without having to worry about brush strokes, missing spots,etc. He then finished the frame of the chair with semi-gloss poly.


The next part is the fun part. Just like the bench in our foyer, we’re starting out with small upholstery projects and hoping to work our way up from there. We both oddly enjoy looking through fabric options that will tie the entire room together, and while we often have different styles, we’re usually pretty good at coming to a consensus on this. And because the office was going to be more of a masculine-themed room, we went with a gray and white striped pattern to complement the black frame.
The original cushion was still full enough for us to use, so we just played around with the fabric a bit to minimize the number of folds/creases and get a perfect seam. And this is when a staple-gun becomes one of our friends.
The cushion sits seamlessly in the frame of the chair, so once we were done upholstering, the chair was complete.


And here’s a sneak peak in the office itself. One step closer to finishing the look of this room.

