It’s not every day you get to turn your childhood bedroom into a custom walk-in closet. But that’s exactly what Dan was about to do, helping his mom double the size of her storage space.
This would be an undertaking similar to the mudroom storage Dan built in our basement. The closet would consist of three column shelves, with poles for hanging clothes in between. Each column would be finished off with baseboard and crown molding, helping to complete the look and give it a more built-in feel.
The columns and shelves would be built using plywood, with a base of 2x4s. The base provides stability to the columns, and the plywood allows them to be lightweight enough to transport for installation. Because the weather’s getting colder, Dan did all of the building and sanding out in the garage, and brought them into the basement in between for painting. A few pros and cons to this. The pros being that the mess stayed in the garage, making for easier clean-up, and the columns could dry more quickly in the basement than if they stayed outside. The con being the amount of times we had to lug all three of the columns back and forth between the garage and the basement, and of course, it was in the middle of a snowstorm.
Frame It
And so the work begins. The first step was to use the table saw to cut the plywood to size. Dan’s childhood home is somewhat of a raised cape, so his old bedroom ceiling angles down toward the outside of the house. This meant that we’d have two shelves of the same, full height of the room, and a third that would be about a foot shorter to accommodate for the angle.
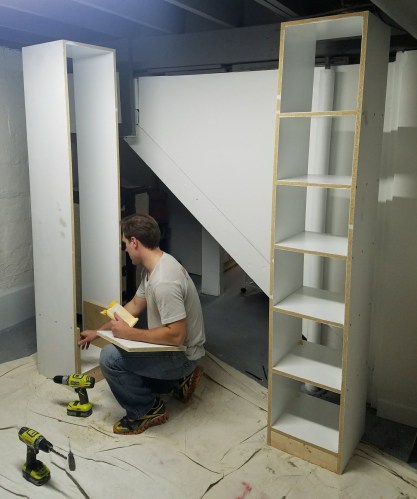
Once we had the plywood cut to the right measurements, Dan built out the frame of each column.
Build It
Now that the frame was built, the columns were given a quick layer of primer. We’ve learned over the past few projects that adding oil primer first helps to block any of the wood grain or imperfections from eventually seeping through the paint. The primer, however, does add a bit of roughness to the surface, so the columns were sanded smooth before being brought indoors.
With the columns indoors, Dan was now able to keep warm and complete some of the finishing work. This included installing the shelves, each 12 inches apart. The two taller columns have 6 shelves, and the shorter has five. To make the finishing work easier, the columns and shelves were painted first.
Finish It
With the shelves in place, it was time to bring the columns back outdoors for the final build. This is when Dan added one inch trim to the front of the columns and shelves, giving the face of the columns a more complete look.

He also added baseboard and crown molding to help shape the final look of the columns themselves.
After adding these features, a bit more priming was needed on the face and trim of the columns. Which meant one more round of sanding before bringing the columns back indoors.
Back inside, a final coat of semi-gloss paint was added, with a few touch-ups here and there. With the columns mostly complete, the backing was added as a final touch. This backing was made from 1/8 plywood that had been previously painted, giving them a finished look.
And with that, the columns were built and the closet was ready for installation.
Bring It To Life
Dan and I hauled the three columns into the back of my dad’s SUV, the only vehicle big enough to transport these bad boys. Dan’s brother then met us at their parents house, which was a big relief because that meant the heavy lifting for me was over 🙂
The hardest part of the installation was getting the columns up the stairs without damaging anything. Once up the stairs and in Dan’s childhood bedroom, he and his mom played around a little with the exact placement of the columns, and determined the width and height of the poles. Once everything was decided upon, the poles were secured, with one opening that include one pole (for hanging dresses), and the other section with two poles, one above the other (for hanging everything else).
For as many hours as it took to build the closet system, that’s how many minutes it took to install. Long build. Quick installation. Wallah!


It wasn’t long before the shelves and racks were filled up. In fact, only a few hours later we were sent a picture of the newly installed walk-in closet fully stocked. All that was missing was a pretty chandelier and a rack for shoes. Perhaps another project for us 🙂

