Two years ago, I began piecing a vanity together with the idea that I would one day refinish it. The seat and vanity itself came from one seller, and the mirror from another. Each piece with a ton of character and beauty in their own right, that when together, look like they were made for each other. And considering I used to be completely happy sitting on the floor in front of a mirror to get ready in the morning, this was definitely a step up.
For this refinishing project, I wanted to keep the same look of each piece, but bring back to life what has dulled over the years. That meant a bit of extra work in ridding each piece of their imperfections to make way for a shiny new coat of stain and poly (rather than the simpler approach of refinishing it with a top coat of Dan’s favorite white paint).


This one was a joint effort between Dan and I, as he’s the master of stripping and sanding projects down to bare wood, and I have a knack for cleanly applying stain and poly.
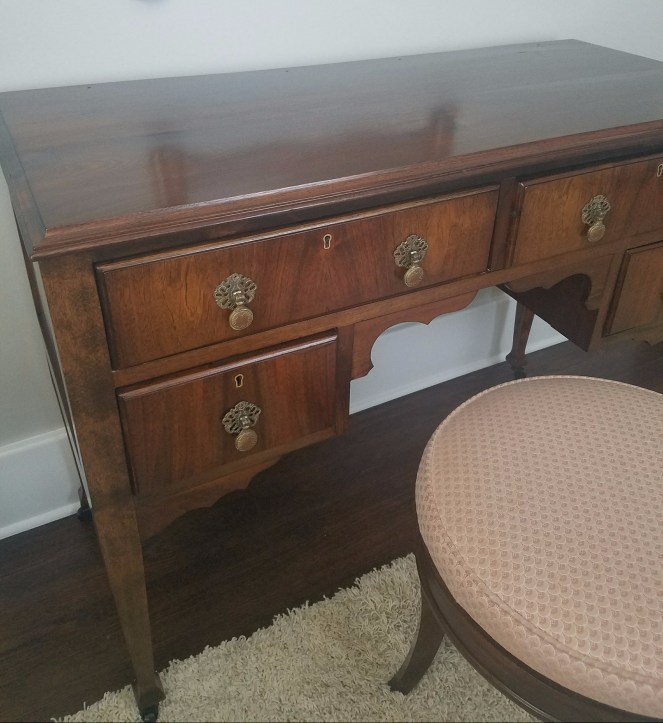
Stripping and sanding always sounds easy, but it’s really a 2-3 day process that involves a lot of manual work. Especially when you have a project like this one that has a lot of grooves and intricate detail – makes for a beautiful piece, but also a lot of work. In addition to stripping and sanding, Dan made minor modifications to the top that included filling in two holes that must have been left behind by the original mirror. Once completed, we were left with a beautiful blank canvas to bring back to life.


The top of the vanity itself was our favorite piece to bring to life. After sanding it down, we discovered that the top was finished with a unique type of wood that we haven’t worked with before. Our guess is that it’s Walnut, but let us know if you can help identify it! (Looking at you, Uncle George).

After testing a few stain colors, we went with our tried-and-true Minwax Dark Walnut for our color. Turns out the vanity itself is made out of a few different types of woods, which all took the stain a bit differently. Nevertheless, it added a bit of dimension to the vanity rather than it all being one uniform color. The three layers of poly helped to blend the colors together and bring out the wood grain even more.
The original hardware was beautifully detailed, but lost it’s luster as well. This was an easy fix, as we used our old crockpot method to help bring back the shine. Add water, laundry soap, and the hardware to an old crockpot and cook it on low overnight. With easy scrubbing, the old falls right off and reveals the original finish.
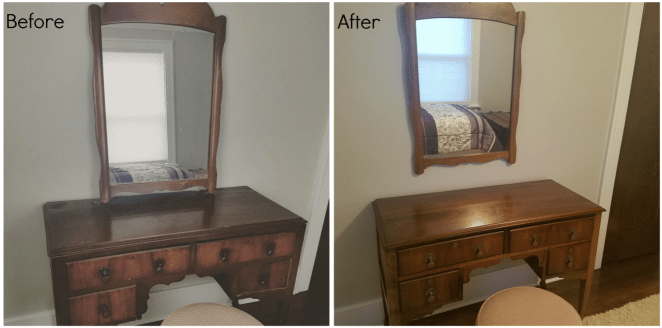
Once refinished, it was time to put everything back into place. Each piece made it’s way back to it’s original home, except for the mirror. You’ll notice from the before and after photos that the finished product included a wall-mounted mirror.
And with that, the dull, lifeless vanity that I’ve put to good use over the last two years now has new life, and a promise to be put to good use for years to come.


From the picture it’s hard to be sure of the wood species. I’ve seen that lighter streak in cherry but not in walnut. I’ve never worked in walnut so I’m not sure; too pricey. It it’s veneer, it could be almost anything. Lots of veneered pieces were sold in the 1st half of the 20th century because of the explosion of home ownership. As for the different woods in the case, cheaper wood is usually used for secondary pieces; even I do it..
Overall, the pieces look terrific; a great job by both of you again.
LikeLike