In the midst of our constant home renovations, its nice to throw in fun diy projects along the way. Dan deems these our “side projects,” and we always have a few going on at a time.
This one in particular was especially fun for both of us, as Dan got to dive into a bit more woodworking, and I got to try my hand at basic upholstery (something I hope to soon apply to a couple of wingback chairs that are waiting ever-so-patiently for me in my basement).
The idea was to create a small, entryway bench for our front foyer, equally cute as it is functional. At first it may sound like a big undertaking, but once we got going, there wasn’t a whole lot to it.
What we needed
– ¼ plywood – 32″ long (this will be the seat of the bench)
– 1×4 pine – 2, 32″ pieces, 2, 12″ pieces (to frame around the seat, will add height to the bench)
– 4×4 wood blocks – these will go into each of the four corners, and will be where the legs screw into the seat of the bench
– 4 corner brackets/top plates – will screw into each of the four wood blocks, securing the legs
– 4 furniture legs – 14.5″ tall
– 2 inch foam
– Batting
Framing the bench
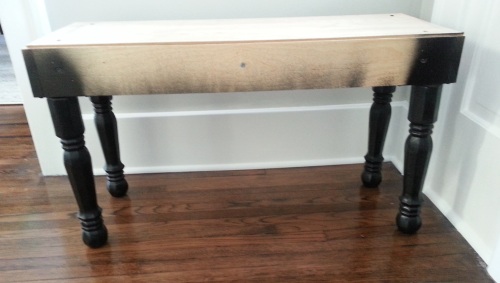
Dan got a head start on this by cutting the seat of the bench and framing pieces down to size. After screwing these together, he added the 4×4 wood blocks to each of the corners.

We then picked up four, solid-pine furniture legs from Home Depot. When staining, we usually prefer to work with oak over pine, as oak tends to give us more of the color we’re looking for. But since we planned on painting the legs anyway, pine would work just fine. These legs will screw into the seat by using a bracket, or top plate, in each corner.
Now that we had the framing for the bench, Dan added 2 layers of black spray paint, and two layers of satin clear coat, to the legs.

Picking out fabric
To be honest, the hardest part of this process was picking out the fabric. I think we spent more time in Joann’s looking at all of the options than we did actually upholstering the bench.
Do we go with a solid color? Something with a weave pattern? Should we try something bold? Will this match the rug in the foyer? Just a few of the questions we asked out loud while pacing back and forth through the aisles, looking at the same fabrics over and over again.
In the end, we went with something that didn’t stand out to us at first, but after a second (okay, maybe third) glance, I knew it would look great with all variables considered. And it was a bit more bold than I’d normally go. See, sometimes, I even surprise myself.

Our first attempt at upholstery
It was now time to try our hand at upholstery. This is about as straightforward as it comes. No sewing. No stitching. Just a few folds, and a lot of staples.
The first thing we did was cut the two-inch foam to size, and spray-glued it to the seat of our bench. Easy enough.
We then wrapped the bench in batting, stapling underneath. This gives the bench a smoother finish, and adds a bit of cushion to the previously-exposed wood frame.

And now it was time for the fabric.
Its worth noting that when working on projects, I have a tendency to mess just the tiniest things up pretty easily. And this project was no different. Like the measurements of the bench, and how much fabric was actually needed. To be fair, Dan has a tendency of his own, and that’s to wander off when I’m in line at a store. So when they were cutting the fabric and I wasn’t 100% sure on the specs, I took a guess and thought that 2 yards would be plenty, since the bench was only 12 inches wide. Well guess what, I didn’t account for the sides of the bench which each measured 4 inches, plus 2 inches of foam. For a total of, you guessed it, 24 inches, aka 2 yards. Good thing the worker that day cut it closer to 25 inches. We were able to wrap that fabric ever-so-snuggly around our bench, and made it work perfectly. I’ll just say that I was avoiding waste, to make myself feel better.
But anyway, back to the upholstery. It was really all about pulling the fabric snug, and stapling our way from the middle, out.

The corners were the trickiest part, but we learned a few tips from watching other videos, and went with the “fold it like a present” method. This gave us straight lines, and no bunching at the corners.
After stapling all around, we were left with excess fabric – nothing a pair of scissors couldn’t fix. While you’re not going to see the bottom, it still looked a little rough with the fabric trimmed and stapled, and the bare wood showing. Dan came up with an idea to add a layer of black felt to the bottom, hiding all of these imperfections. We had this laying around from a previous project, and were able to staple it down, giving the bottom of the bench a nice, clean look.

All that was left to do was screw the top plates into each of the four corners, and then screw in the legs.

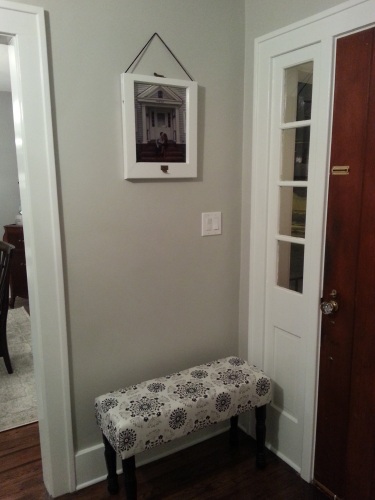
Bench. Built.
And just like that. We had our bench built, and our first upholstering project under our belts.

The fabric that we chose turned out to be a better match than we could have ever anticipated. The white/gray/black pattern blended perfectly with the walls and trim where the bench would sit. A nice complement to our previous window picture frame project, and the perfect addition to our foyer.


For your Entryway Bench, how did you attach the 4×4 wood blocks to the bench frame?
Looking to make something similar. Love how your bench turned out!
LikeLike
Hi there! We used 2.5in wood screws to attach the wood blocks to each of the corners. The legs then screwed into each.
Good luck on your project!
LikeLike