One of the home improvement projects I’ve been looking forward to the most is adding window seats to the master bedroom. You might remember that we previously tore down, rebuilt and added more closet space, filling each corner of the room and giving us 2 closets each (or as Dan would say, 3 for him, 1 for me). Each pair of closets are centered around a window, giving us the perfect opportunity to finally build those window seats.

Like all projects, this one began with another trip to our second home, Home Depot.

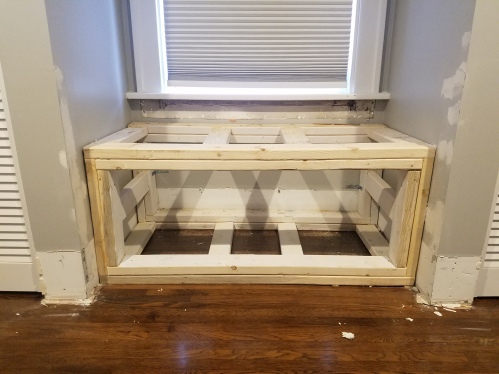
Dan started by building the base of the seats. The outer frame was created by doubling up on 2x4s. Slats were added across the top and bottom for added support. He took measurements and then built each base out in the garage before bringing back into the house to install. You’ll notice from the patch work in the below picture that it was a bit of a tight squeeze, but we made it work =)
Dan then used sanded plywood for the top of the window seat, and trimmed it out using pine 1×2, giving the top a more finished look. The front face of what will be the drawer opening was also trimmed out, using 1×6.
To piece everything together, we put the baseboard and window trim back into place and added bullnose across the bottom of the window seat.

The idea was to then finish the window seat in white, matching the trim in the rest of the house. Which meant everything had to be primed first. We then added 3 coats of white paint (Cashmere from SW), which has a clean, glossy finish to it.
And just like that, the base was built.
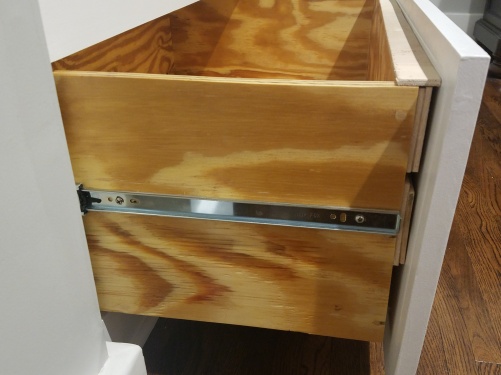
Next up was to build the drawers, which was done using plywood. After cutting the wood to size, Dan then used glue, clamps, and nails to assemble the boxes. We decided to keep the drawers themselves looking natural, so we simply added a layer of poly to shine them up a bit.
The “face” of the drawers were built separately. Dan used trim to create an “in-lay” effect in the drawer face, adding a bit more dimension and detail to the window seat itself.
Now came the hard part. While we had all the pieces in place for the drawers – boxes, tracks (bought off Amazon), and face – it was time to install the drawer itself. Just add the tracks and slide the drawers into place, right? Oh no. Long story short, it look 3-4 evenings, a broken pair of tracks, and a whole lot of swear words before we were able to install the drawers. Why? Well… while we always make every attempt to build things square, when you’re working with plaster walls as your base, something is bound to be off.

We were able to fix the problem using a few shims, and now the drawers slide seamlessly back and forth.

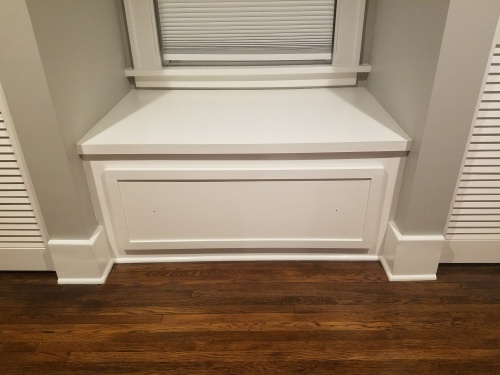
The final touch on the window seat was adding drawer knobs to the face of each drawer.

We also added matching knobs to the closets themselves, giving each side of the room a consistent look.

One thing that’s glaringly missing from these window seats are the top cushions that will give it a much more cozy look (and make it much more comfortable to sit on). While the cushions are still in progress (as I’m well overdue for a sewing tutorial), we didn’t want to wait to share the rest of this project with you. Once I have those cushions made, we’ll update you on the final look – likely with a picture of me cozied up on the window seat with a good book.
Update
Okay, so no picture of me cozied up on the window seat, but did want to give you a quick update. I finally got around to sewing cushions for them, with a little (okay, A LOT) of help from my mom. I never really did learn how to sew, and she’s kind of the master of a sewing machine, so her help went a long way.
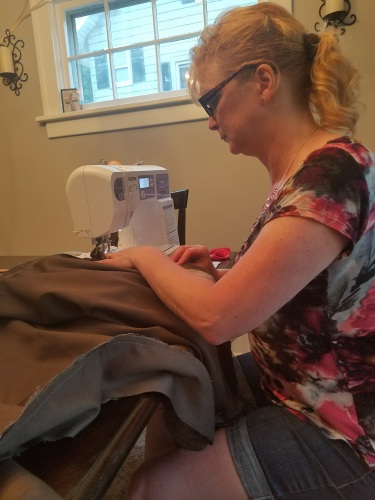
We ended up using a textured gray fabric to complement the rest of the room, with hopes of dressing up the window seats a bit more by swapping decorative pillows in and out (depending on my mood, of course).

I love how they came together, and can now take full advantage of the window seat by curling up with a good book (and a glass of wine).
As for my sewing skills, those are still a work in progress. But I better get my butt in gear, since Dan’s been building furniture left and right all summer. More to come on those projects as I finish them off with cushions.

it looks gorgeous! You guys are really good at this. 🙂
LikeLike
Looks great! Are you drawer fronts plywood with an extra layer of molding on the surface for the inlay? How did you finish the plywood sides so they look finished? Beautiful work!
LikeLike
Hi Lauren,
Glad you like how it turned out! We used 1×2 wood for the frame of the drawer front, and then filled in the middle with MDF. This gave it that inlay look.
We splurged a bit on the plywood and bought the “sanded” version, which comes much more smooth than your typical plywood. This helped to give it that finished look right off the bat, which we then coated with poly to help it shine.
LikeLiked by 1 person
We are well acquainted with the sanded cabinet grade plywood with our current cabinet projects. It sure makes a different, right!? Beautiful work!
LikeLike