And now for a big piece to our puzzle. One that will make the house look much more put together. Finally finishing our stairs and banister.
We really were working with a thing of beauty. A set of old stairs (creaks and all) paired with a beautiful banister that wrapped itself all the way upstairs.


Looking back on when we stained the floor, we simultaneously stained the treads of the stairs as well. We were a bit messy in this process, because we knew we were going to be staining the banister and painting the risers anyway. But here we are, months later and still unfinished stairs.
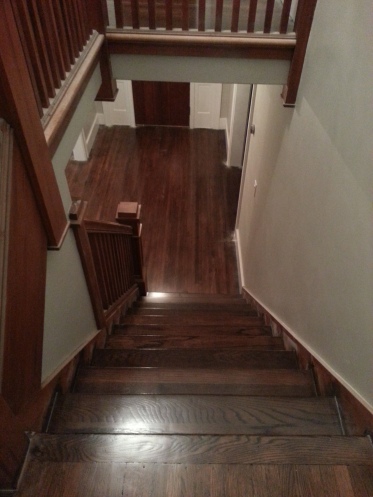

As my loving brother sarcastically noted upon walking through our front door, “You spent six months working on the house, and the first thing you see when walking through the front door are messy, unfinished stairs.” Thanks Jeff. But he had a point. We’ve become immune to the look of it over the last few months, but honestly, it’s an eye-sore.
If painting the risers white was all that was needed, I swear we’d be done by now. The procrastination came from the fact that we had to refinish the railings and banisters first, which we knew would prove to be quite the project (plus, we had plenty other projects keeping us busy).
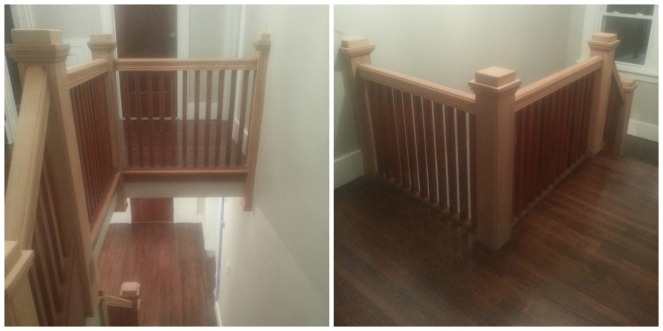
The goal was to stain the railing and banisters a bit darker, removing the orange tint and matching them with the look of the floors. And then contrast this darker wood look with the white risers and trim.
Here are pictures of inspiration:


Let’s get started
Take one guess on what the first step was. Yep. Sanding. If I’ve said it once, I’ve said it a million times. I am so. sick. of dust. But I suppose that’s all part of the job. So we taped off the foyer, and got to work.
I should say that before sanding, Dan got a head start by using chemical stripper on the railings and banisters. This helped the poly to peel right up, although, I’d caution against using it, as it’ll take the finish right off of anything it touches (including already finished floors).
Once that was completed, it was then time to sand everything down to make sure all of the old finish was off. I started with the risers and the railings. While Dan focused on the banisters and all their crevices.


A few nights and one long weekend later, and we had the banister and risers down to bare wood.

Staining the banister
Now that the dirty work was done, it was time to make this staircase come to life. After testing a few different options, we decided on General Finish’s Gel Stain in Antique Walnut. The thickness of the gel stain will give the banister a more uniform look, and the Antique Walnut will give us a color that’s a shade or two darker than the floors.

It took two layers of stain to get us to the color we wanted. And finished that off with three layers of semi-gloss poly. And now we’re starting to see glimpses of what the final outcome will be.


Painting the spindles and risers
Ohhhhh, halfway there. (I think I’ve used that one before, but it truly never gets old)
Now that the banisters and railings were stained, it was time to make all that woodwork pop. The idea of contrasting our dark wood with something as bold as bright white always made me nervous. I don’t want to take away from the traditional look of our house, but I also don’t want it to look outdated. ‘Timeless’ is really what we go for in all of our projects. And that’s where Dan comes in. He has the vision, and the persuasion, just as he did when converting our first floor trim to white. And because that came out great, my trust is in his hands.
So here goes nothing.
Painting sounds easy, and honestly, it wasn’t bad. Just time consuming. (Pretty sure I’ve said that before too)
When painting the trim on the first floor, we had some trouble with yellow stains coming through. We learned that we could block this out by applying a layer of oil-based paint first. And so that’s what we did on the spindles and risers. Two layers, just to be safe. Oil-based paint, sand (ugh), oil-based paint, sand (ughhhhh). Dan cut in the spindles, while I rolled. And vice versa on the risers. Turns out I have a knack for cutting in the darn risers, which I’ll get to later.
The white, oil-based paint gave us a rough idea of what the finished product would look like. A very rough look. I say that because this base coat is not as smooth as the finishing paint, so it doesn’t look as good as it (hopefully) will with the final layers.
And now, for those final layers. Dan took on the spindles while I cut in the risers. We spent an entire Saturday doing this. On average, I think it took me a half hour per riser. Which sounds like a long time. And is a long time. (We have 14 risers ya know.) We had to get clean lines where the bottom of the riser met the stair. The last thing we need are jagged lines ruining the detail work of our stairs, and I was not about to back down from the challenge.

That Saturday afternoon was followed by a few more nights of painting the second coat. Cutting in was easier the second time ’round, as my lines were already there (thank goodness). And Dan was just having a blast repainting those spindles =P

Final product
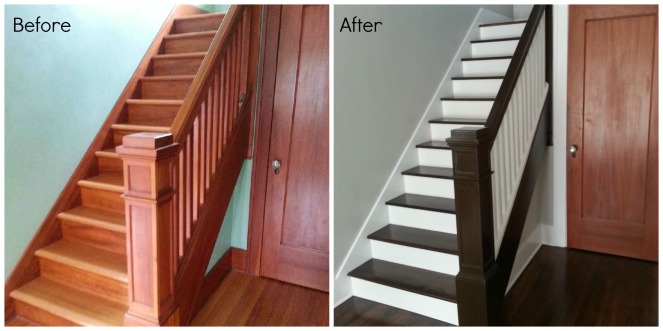
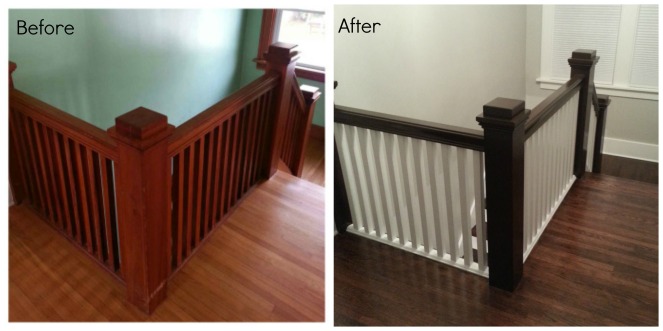
From the start of sanding to the final layer of paint, working most nights and weekends, this project took us about a month. A long process that certainly paid off in the end. While I was admittedly skeptical at first, the stairs came out better than I could have imagined. Now when you walk through our front door, you see a staircase that stands out while still complementing the overall look of the house, rather than the “messy, unfinished stairs” that my brother was so quick to point out. Let’s hope his opinion changes the next time he’s over.


Before and After


Oh Katie, Dan! A totally brightened and absolutely gorgeous outcome!!!! You guys do the best work!! ❤
LikeLike
Thank you 🙂
LikeLike
These look amazing!
LikeLike
So glad you like how they turned out!
LikeLike
That came out really well. The contrast of the dark stain with the white paint really makes an impression.
LikeLike
Love the stairs. If you need more sandpaper, try this
http://www.woodworkingshop.com/category.aspx?id=25&f1=BARGAIN+BOXES
Roll ends from a sanding belt manufacturer. Random grits but heavy cloth backing. I like them!!
Nice to see you 2 in church today.
LikeLike
Thanks for the suggestion! We’ll definitely look into it!
Sorry we missed you in church. Hope to see you guys soon!
LikeLike
Can you please let me know what finishing paint you used on the riser. You mentioned oil based for the 1st and 2nd copy (sanding in-between each coat) but didn’t say what you used as finishing white – was it oil based also ?
LikeLike
Hi Maria,
We used the oil-based paint as a primer so that none of the knots or old stained woodwork would come through. We did this for all of our trim in the house and then white risers. For the finishing coat, we used Sherwin Williams Cashmere in White, with a semi-gloss finish.
Let me know if you have any other questions!
Katie
LikeLike